透明材质
最近项目中需要实现透明效果 ,探索下透明透明材质
透明材质(如玻璃、水)的实现,远不止是简单地“让物体变透明”那么简单。它涉及到渲染顺序、混合计算和性能优化等一系列核心概念。
一 核心原理:混合
透明渲染的核心是 混合。它与渲染不透明物体时简单的“深度测试-覆盖”模式不同。
不透明物体渲染
对于每个像素,GPU会进行深度测试。距离相机更近的片元会覆盖掉更远的片元。
最终颜色缓冲区里只留下最前面的那个颜色。
透明物体渲染(Transparent Rendering):
当渲染一个透明片元时,GPU不会简单地覆盖背景颜色。
它会将当前片元的颜色和帧缓冲区中已经存在的颜色按照一个特定的公式进行混合。
这个混合公式由混合方程 和混合因子决定。
最常见的混合模式是 Alpha 混合(Alpha Blending),其标准公式为:
Final Color = (Source Color * Source Alpha) + (Destination Color * (1 - Source Alpha))
也就是最终颜色是前景色和背景色按透明度的比例进行混合的结果。例如,一个 Alpha 为 0.5(半透明)的红色物体覆盖在蓝色背景上,最终会得到 (Red * 0.5) + (Blue * 0.5) = Purple。除此之外,还有一些其他的混合模式,如乘法混合等
二 核心挑战与解决方案
透明渲染最大的挑战是 渲染顺序。
问题:
混合操作依赖于背景(目标颜色)。这意味着你必须从后往前渲染透明物体。如果你先渲染了一个靠近相机的透明物体,它就会错误地与它后面可能存在的任何颜色(比如默认的黑色背景)进行混合。当之后再渲染它后面的透明物体时,就无法再与正确的背景色(本应是第一个透明物体的颜色)混合了,从而导致视觉错误。
解决方案:
对透明物体排序(Sorting):
这是最常用但也最麻烦的方法。在CPU端,对场景中所有透明物体按照它们到相机的距离由远及近进行排序。
缺点:
性能开销:每帧都需要计算距离和排序。
无法处理自身相交的复杂透明物体(比如一个透明的球体或环),因为无法确定其内部片元的正确顺序。
物体很多时排序可能变得复杂。
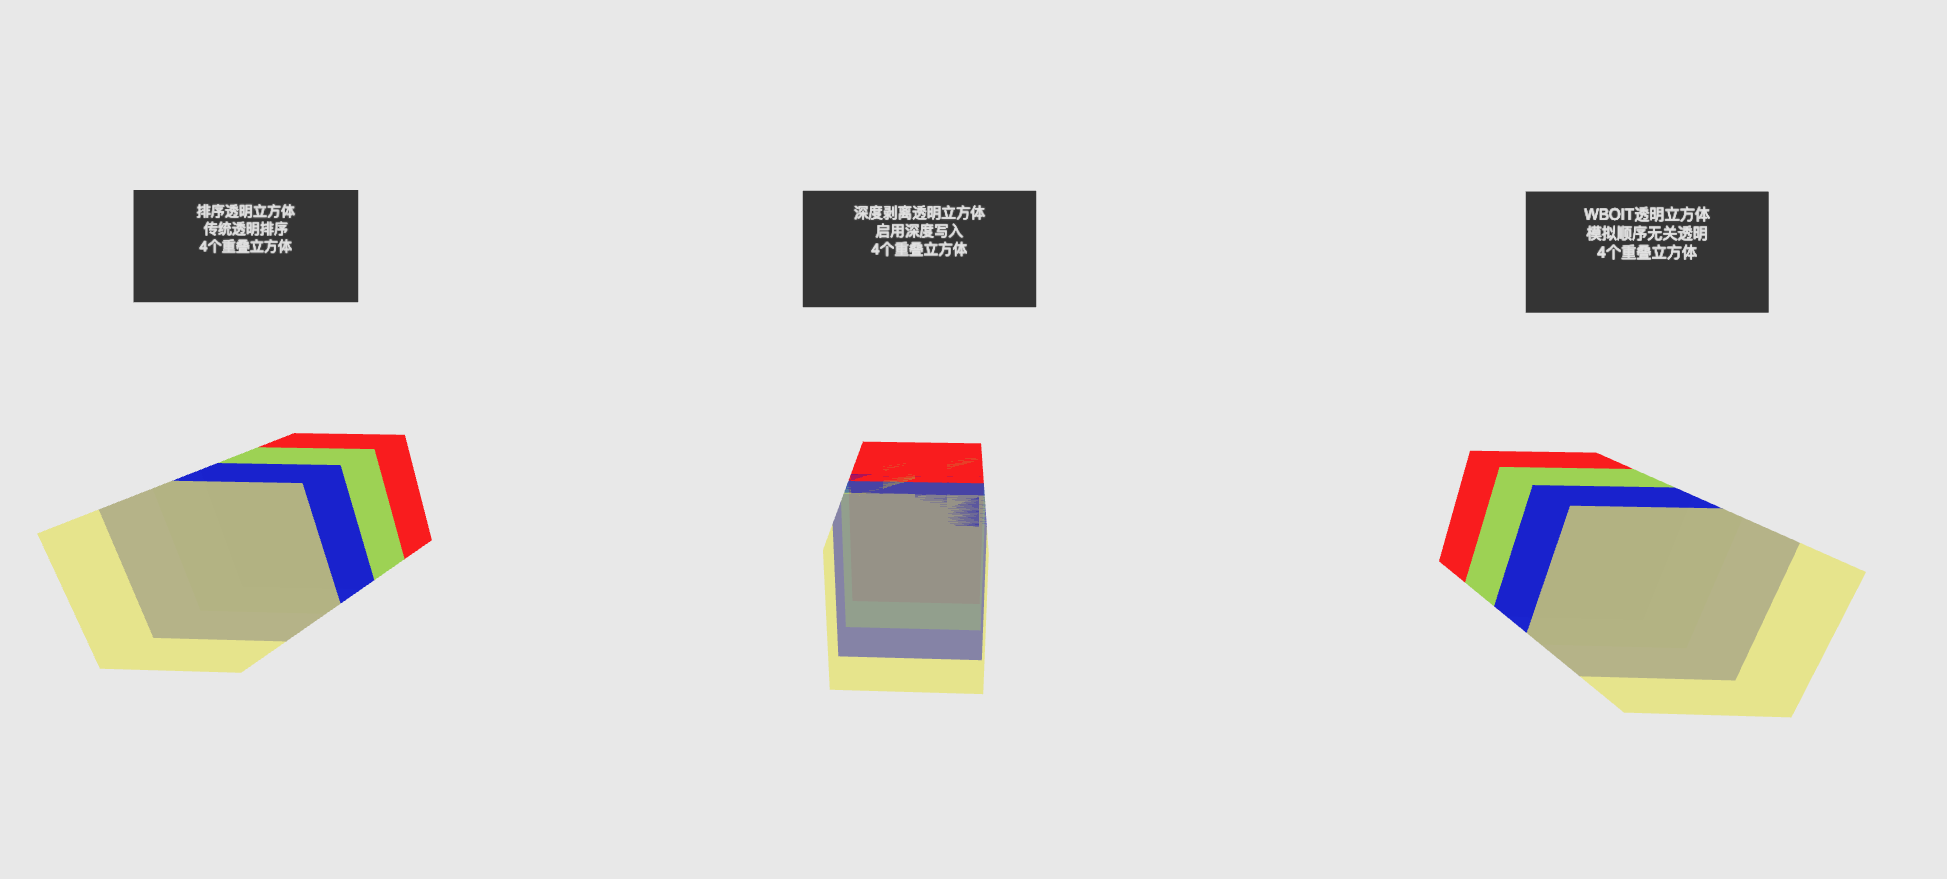
上图左侧四个透明立方体重叠用排序方法的代码如下
class SortedTransparency {
    private scene: THREE.Scene;
    private camera: THREE.PerspectiveCamera;
    private renderer: THREE.WebGLRenderer;

    constructor() {
        this.scene = new THREE.Scene();
        this.camera = new THREE.PerspectiveCamera(75, window.innerWidth / window.innerHeight, 0.1, 1000);
        this.renderer = new THREE.WebGLRenderer({
            antialias: true,
            alpha: true
        });
    }

    createTransparentCubes() {
        const cubes = [
            { color: 0xff0000, opacity: 0.8, position: [0, 0, -0.75] },
            { color: 0x00ff00, opacity: 0.7, position: [0, 0, -0.25] },
            { color: 0x0000ff, opacity: 0.6, position: [0, 0, 0.25] },
            { color: 0xffff00, opacity: 0.5, position: [0, 0, 0.75] }
        ];

        cubes.forEach((cube, index) => {
            const geometry = new THREE.BoxGeometry(1.2, 1.2, 1.2);
            const material = new THREE.MeshBasicMaterial({
                color: cube.color,
                transparent: true,
                opacity: cube.opacity,
                side: THREE.DoubleSide,
                // 关键设置:不写入深度,依赖排序
                depthWrite: false,
                depthTest: true
            });

            const mesh = new THREE.Mesh(geometry, material);
            mesh.position.set(cube.position[0], cube.position[1], cube.position[2]);
            this.scene.add(mesh);
        });
    }

    // 自定义排序算法
    sortTransparentObjects() {
        const cameraPosition = this.camera.position.clone();

        this.scene.children
            .filter(child => child.material?.transparent)
            .sort((a, b) => {
                const distanceA = cameraPosition.distanceTo(a.position);
                const distanceB = cameraPosition.distanceTo(b.position);
                return distanceB - distanceA;
            });
    }
}使用深度剥离:
深度剥离是一种多通道渲染算法,其核心在于依次提取并渲染从近到远的多个深度层。深度写入在这一过程中至关重要
第一遍 :渲染最表层
操作:像渲染不透明物体一样,正常开启深度测试和深度写入。
目的:获取离相机最近的、所有可见(包括透明和不透明)片元的颜色和深度值。这一遍的结果(深度值)会被存储到一张纹理中,称为“前一层深度纹理”(
PreviousDepthTexture)。深度写入的作用:建立第一层深度的基准,为下一遍剥离提供比较依据。
第二遍 :剥离下一层
操作:
将上一遍得到的
PreviousDepthTexture传入Shader。Shader中,将当前片元的深度与
PreviousDepthTexture中对应位置的值进行比较。
深度测试条件设置为
Greater(或使用Equal考虑精度误差)。只有当当前片元深度大于(即位于更深处的)PreviousDepthTexture中的值时,才通过测试并被渲染。同样开启深度写入,将这一层通过测试的片元的深度值写入深度缓冲区。
目的:“剥离”并获取比最表层更深一层的颜色和深度。
深度写入的作用:更新深度缓冲区,确保在渲染下一层(Peel 2)时,能够以这一层(Peel 1)的深度作为新的基准进行比较。
重复第2步 N 次
每一遍都使用上一遍生成的深度纹理作为输入,继续剥离更深的层。每一遍都会生成一个新的颜色纹理和深度纹理。
深度写入的作用:在每一遍中都至关重要,它使得算法能够逐层深入地“挖掘”场景的深度信息。
合成阶段(Composite)
操作:将所有剥离得到的颜色层(通常从最远的层开始),按照从后往前的顺序,使用标准的Alpha混合公式进行混合。
目的:将所有层的贡献组合起来,形成最终的、正确的透明效果。
深度写入的作用:在此阶段不再需要,因为合成是在2D屏幕空间进行的。
如上图中间的示例,可以看到如果立方体叠在一起,深度剥离方式在重叠区域出现闪烁,就是因为开启了深度写入,然后出现深度冲突现象:多个透明对象在相同深度位置。示例实现的关键代码如下:
class DepthPeelingTransparency {
    private scene: THREE.Scene;
    private camera: THREE.PerspectiveCamera;
    private renderer: THREE.WebGLRenderer;

    constructor() {
        this.scene = new THREE.Scene();
        this.camera = new THREE.PerspectiveCamera(75, window.innerWidth / window.innerHeight, 0.1, 1000);
        this.renderer = new THREE.WebGLRenderer({
            antialias: true,
            alpha: true
        });
    }

    createTransparentCubes() {
        const cubes = [
            { color: 0xff0000, opacity: 0.8, position: [0, 0, -0.75] },
            { color: 0x00ff00, opacity: 0.7, position: [0, 0, -0.25] },
            { color: 0x0000ff, opacity: 0.6, position: [0, 0, 0.25] },
            { color: 0xffff00, opacity: 0.5, position: [0, 0, 0.75] }
        ];

        cubes.forEach((cube, index) => {
            const geometry = new THREE.BoxGeometry(1.2, 1.2, 1.2);
            const material = new THREE.MeshBasicMaterial({
                color: cube.color,
                transparent: true,
                opacity: cube.opacity,
                side: THREE.DoubleSide,
                // 关键设置:启用深度写入
                depthWrite: true,
                depthTest: true
            });

            const mesh = new THREE.Mesh(geometry, material);
            mesh.position.set(cube.position[0], cube.position[1], cube.position[2]);
            this.scene.add(mesh);
        });
    }

    // 深度剥离渲染
    renderDepthPeeling() {
        // 1. 渲染不透明对象
        this.renderOpaqueObjects();

        // 2. 多遍渲染透明对象
        for (let pass = 0; pass < this.maxPasses; pass++) {
            this.renderTransparentPass(pass);
        }
    }

    renderTransparentPass(pass: number) {
        // 设置深度测试函数
        if (pass === 0) {
            gl.depthFunc(gl.LESS);
        } else {
            gl.depthFunc(gl.GREATER);
        }

        // 渲染透明对象
        this.scene.children
            .filter(child => child.material?.transparent)
            .forEach(child => {
                this.renderer.render(child, this.camera);
            });
    }
}
加权混合顺序无关透明 (WBOIT)
原理:也是一种多渲染目标(MRT)技术。它在一个Pass中,将透明物体的颜色和透明度以加权的方式累加到多个缓冲区中(如
accumulation和revealage缓冲区),无需排序。最后用一个全屏Pass将这些缓冲区进行合成。优点:顺序无关,性能优于深度剥离
缺点:是一种近似算法,在极端情况下可能不如深度剥离准确,可能会出现混合瑕疵。
上图最右侧的实现示例代码如下
class WBOITTransparency {
    private scene: THREE.Scene;
    private camera: THREE.PerspectiveCamera;
    private renderer: THREE.WebGLRenderer;
    private accumulationTarget: THREE.WebGLRenderTarget;
    private revealageTarget: THREE.WebGLRenderTarget;

    constructor() {
        this.scene = new THREE.Scene();
        this.camera = new THREE.PerspectiveCamera(75, window.innerWidth / window.innerHeight, 0.1, 1000);
        this.renderer = new THREE.WebGLRenderer({
            antialias: true,
            alpha: true
        });

        this.setupWBOIT();
    }

    setupWBOIT() {
        // 创建累积纹理
        this.accumulationTarget = new THREE.WebGLRenderTarget(
            window.innerWidth,
            window.innerHeight,
            {
                format: THREE.RGBAFormat,
                type: THREE.FloatType,
                minFilter: THREE.NearestFilter,
                magFilter: THREE.NearestFilter
            }
        );

        // 创建揭示纹理
        this.revealageTarget = new THREE.WebGLRenderTarget(
            window.innerWidth,
            window.innerHeight,
            {
                format: THREE.RGBAFormat,
                type: THREE.FloatType,
                minFilter: THREE.NearestFilter,
                magFilter: THREE.NearestFilter
            }
        );
    }

    createTransparentCubes() {
        const cubes = [
            { color: 0xff0000, opacity: 0.8, position: [0, 0, -0.75] },
            { color: 0x00ff00, opacity: 0.7, position: [0, 0, -0.25] },
            { color: 0x0000ff, opacity: 0.6, position: [0, 0, 0.25] },
            { color: 0xffff00, opacity: 0.5, position: [0, 0, 0.75] }
        ];

        cubes.forEach((cube, index) => {
            const geometry = new THREE.BoxGeometry(1.2, 1.2, 1.2);
            const material = new THREE.MeshBasicMaterial({
                color: cube.color,
                transparent: true,
                opacity: cube.opacity,
                side: THREE.DoubleSide,
                // 关键设置:禁用深度测试,使用预乘alpha
                depthWrite: false,
                depthTest: false,
                premultipliedAlpha: true
            });

            const mesh = new THREE.Mesh(geometry, material);
            mesh.position.set(cube.position[0], cube.position[1], cube.position[2]);
            this.scene.add(mesh);
        });
    }

    // WBOIT渲染
    renderWBOIT() {
        // 1. 渲染不透明对象
        this.renderOpaqueObjects();

        // 2. 渲染透明对象到累积纹理
        this.renderer.setRenderTarget(this.accumulationTarget);
        this.renderer.clear();

        this.scene.children
            .filter(child => child.material?.transparent)
            .forEach(child => {
                this.renderer.render(child, this.camera);
            });

        // 3. 渲染透明对象到揭示纹理
        this.renderer.setRenderTarget(this.revealageTarget);
        this.renderer.clear();

        this.scene.children
            .filter(child => child.material?.transparent)
            .forEach(child => {
                this.renderer.render(child, this.camera);
            });

        // 4. 合成最终结果
        this.compositeWBOIT();
    }

    compositeWBOIT() {
        // 创建合成着色器
        const compositeMaterial = new THREE.ShaderMaterial({
            vertexShader: `
                varying vec2 vUv;
                void main() {
                    vUv = uv;
                    gl_Position = projectionMatrix * modelViewMatrix * vec4(position, 1.0);
                }
            `,
            fragmentShader: `
                uniform sampler2D accumulationTexture;
                uniform sampler2D revealageTexture;
                varying vec2 vUv;

                void main() {
                    vec4 accumulation = texture2D(accumulationTexture, vUv);
                    float revealage = texture2D(revealageTexture, vUv).r;

                    // WBOIT混合公式
                    vec3 color = accumulation.rgb / max(accumulation.a, 0.00001);
                    gl_FragColor = vec4(color, 1.0 - revealage);
                }
            `,
            uniforms: {
                accumulationTexture: { value: this.accumulationTarget.texture },
                revealageTexture: { value: this.revealageTarget.texture }
            }
        });

        // 渲染到屏幕
        this.renderer.setRenderTarget(null);
        this.renderer.render(this.scene, this.camera);
    }
}
上面的着色器重点解析
WBOIT分为三个阶段:累积 → 揭示 → 合成。合成着色器是最后一步,负责将前两个阶段的结果合并成最终图像
accumulationTexture:存储了所有透明对象的颜色累积和权重累积
revealageTexture:存储了背景被遮挡的程度
// 顶点着色器 - 屏幕空间渲染
varying vec2 vUv;
void main() {
    vUv = uv;  // 传递纹理坐标
    gl_Position = projectionMatrix * modelViewMatrix * vec4(position, 1.0);
}

// 片段着色器 - 核心合成逻辑
uniform sampler2D accumulationTexture;  // 累积纹理
uniform sampler2D revealageTexture;     // 揭示纹理
varying vec2 vUv;

void main() {
    // 1. 读取两个纹理
    vec4 accumulation = texture2D(accumulationTexture, vUv);
    float revealage = texture2D(revealageTexture, vUv).r;

    // 2. WBOIT核心公式
    vec3 color = accumulation.rgb / max(accumulation.a, 0.00001);
    gl_FragColor = vec4(color, 1.0 - revealage);
}
核心公式
最终颜色 = 累积颜色 ÷ 累积权重
最终透明度 = 1 - 揭示值
